How to install a firework LED light without the arms drooping
Fanned out on a wall, a firework light is usually wider than the monitor it sits above, and the arms only hold the shape you set if you know which of the two builds you have. They look the same in a listing photograph and take completely different fixings.
Key takeaways
- Copper-wire branches bend and hold their shape with no fixings; tube arms need a tab at each tip. Identify the build first.
- Wall space is one arm length times two. Lay the light flat and measure the real spread before fixing anything.
- The hub carries every arm and the tail cable. Fix it with a rated fixing, never adhesive alone.
- Copper-wire branches cannot be shortened — bend them back on themselves. Tube arms cut only at marked points.
- Outdoors, water gets in at the joints inside the hub. Mount it to drain, point the tail exit down, keep the power connection indoors.
Which build do you have?
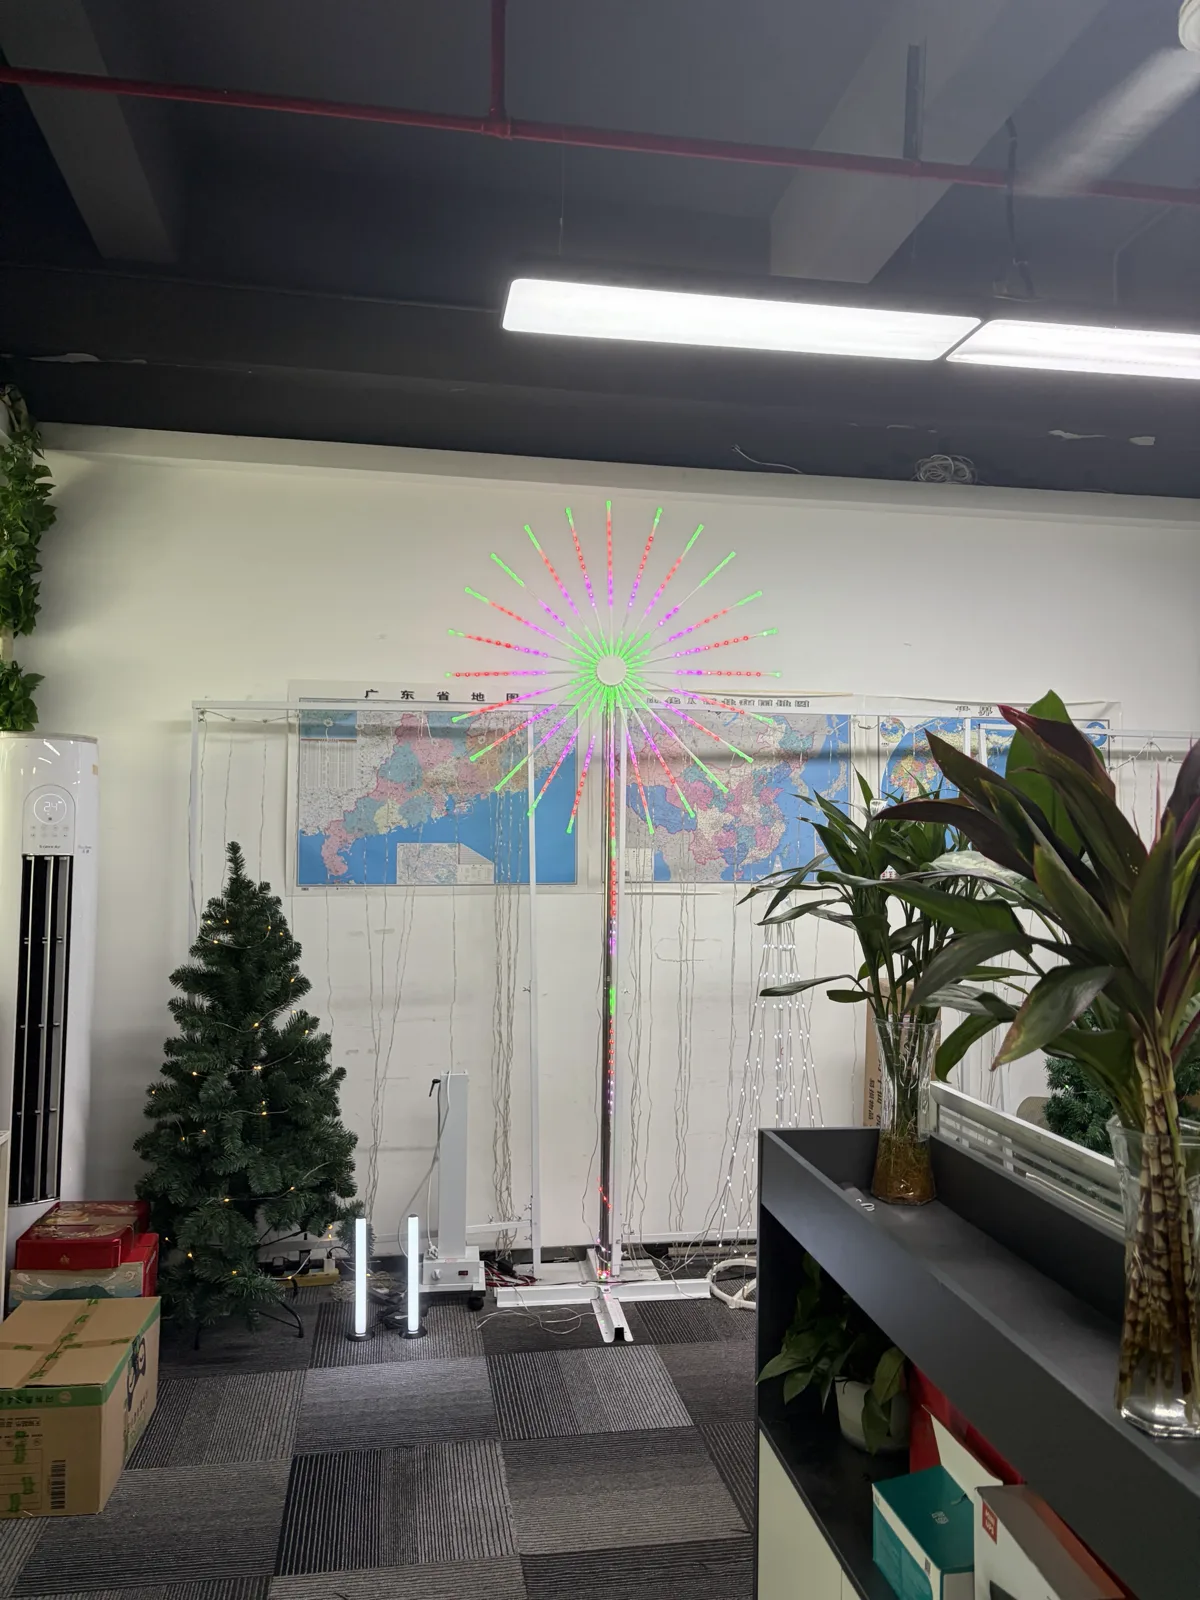
Unlit, the structure is easy to read: one small hub, a set of flexible arms fanning out of it, and a single tail cable leaving the hub for the power supply. The arms are what differ.
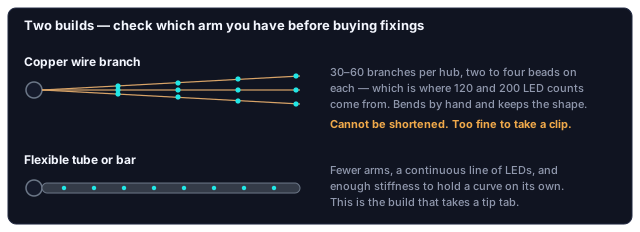
The copper wire build is the common one. Thirty to sixty hair-thin branches leave the hub, each carrying two to four separate LED beads — a 120-LED light is typically 60 branches with two beads each, a 200-LED light 50 branches with four. The wire is soft enough to bend by hand and stiff enough to hold whatever shape you bend it into: the same light can be a starburst, a heart or a loose bouquet depending on how you set it.
The tube or bar build has fewer arms, each a continuous run of LEDs inside a flexible sleeve. Heavier, brighter per arm, and stiff enough to keep a curve without help.
| Copper wire | Tube or bar | |
|---|---|---|
| Arms per hub | 30–60 fine branches | A handful of thicker arms |
| LEDs per arm | 2–4 separate beads | A continuous line |
| Holds the shape you bend | Yes, on its own | Relaxes; needs a tab at the tip |
| Fixings besides the hub | None | One small tab per arm, holding shape not weight |
| Can be shortened | No — a cut kills the branch | Only at marked cut points |
| Re-shaping later | Any time, without touching a fixing | Every change means re-siting tabs |
| Weight and brightness | Lighter, dimmer per arm | Heavier, brighter per arm |
Two things are true of both, and they drive the whole install:
- The hub is the electrical junction. Every arm is fed from it. It is also the only point where all the weight converges.
- Nothing about the arms is rigid. The shape you get is the shape you set. Wire branches hold their own shape once bent; tube arms usually need holding at the far end.
How much wall does the fan need?
Measure one arm from the hub to its tip, then double it. That is the diameter of the circle the light occupies when the arms are fanned out evenly.
People consistently underestimate this. On a desk it looks compact; on a wall it is usually wider than the monitor it sits above. Before you stick anything down, lay the light flat on the floor, fan the arms out the way you intend to hang them, and measure the actual spread. Then check that against the wall.
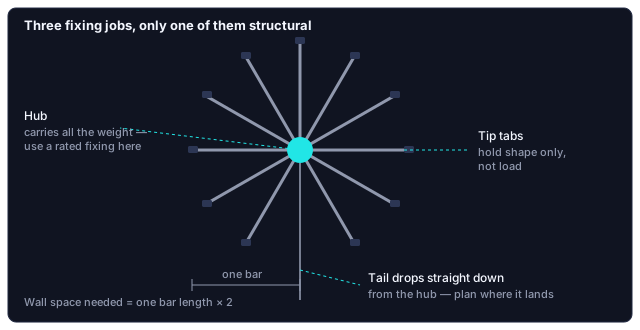
You do not have to fan the arms evenly. Narrowing the spread — pulling the arms into a half-fan or a tighter cluster — is a legitimate layout and often the right answer for a narrow wall or an alcove. Nothing electrical changes.
Mounting: the hub carries the load
Fix the hub first, and fix it properly. It carries the combined weight of every arm plus the tail cable, and it is the one point that cannot let go.
- Mark the hub position. The light extends by one arm length in every direction from this point, and the tail has to reach your outlet from here.
- Fix the hub. On plasterboard or a painted wall, use a fixing rated well above the light's weight. This is not the place to rely on adhesive alone.
- Fan the arms into position. Work opposite pairs — top and bottom, then left and right — so the hub is not pulled off-centre as you go.
- Set the shape. On a copper wire light this is the whole job: bend each branch and it stays put, no fixings at all. On a tube build the arms will relax, so a small tab at or near each tip holds the curve — it only has to hold shape, not weight.
- Route the tail last, once the shape is settled.
Where tabs are needed, we use small tape tabs on our own test wall — fine indoors and easy to reposition while you are still deciding on the shape. If the light is going up permanently, swap the tape for clips once you are happy with the layout, because tape adhesive relaxes over time, especially on a warm wall.
On a copper wire light the shape is repositionable indefinitely: come back a month later and re-bend the whole thing without touching a single fixing. On the tube build every change means peeling and re-siting tabs.
Mounting on a ceiling
Mechanically it works, and the fan looks good overhead. The hub fixing now carries the full weight in shear, and the tail hangs rather than resting against a wall. Fix the hub into something structural, not into plasterboard alone.
The beads sit at fixed points along a continuous pair of conductors, there are no cut marks, and a cut kills the branch. If a wire light is too big for the space, bend the branches back on themselves — a tighter, denser ball is a normal layout and loses nothing. Tube or bar arms are addressable and cut only at marked points; a cut in the wrong place takes out everything downstream of it. No marked cut points means not cuttable.
Where the tail goes
The tail leaves the hub as a single cable and has to reach power. Two things to check before you commit to a hub position:
- Reach. Measure from the intended hub position to the outlet along the route the cable will actually take — down the wall, along a skirting board, behind furniture — not in a straight line.
- Where it will be visible. The tail drops straight down from the hub. If the light is centred above a desk or a bed, that drop lands in the middle of the wall. Plan whether it runs behind something or gets a cable channel.
What the effects look like on the wall
These are effect previews from our own control app — the patterns the controller drives a firework light through. They are also why fan spacing matters: an effect that travels outward from the hub reads clearly on an even fan and turns to mush on a crowded one.



These are the app's own effect previews rather than photographs of a wall. In a room the same effect looks softer, and the bars nearest the hub always read brighter because their light overlaps.
App-controlled, or remote-only?
Two products share the name. A great many firework lights are not app-controlled at all: a small handheld remote runs a fixed set of eight modes — steady on, twinkle, slow fade, chase and the rest — from 4 × AA batteries, a USB power bank or a solar panel, and that is the entire feature set. Nothing wrong with them, but no app will ever connect to one, and a good deal of "it will not pair" traffic is people trying.
| Remote-only | App-controlled (ours) | |
|---|---|---|
| Control | Handheld remote, 8 fixed modes | Magic Lantern over Bluetooth |
| Power | 4 × AA, USB power bank or solar panel | Supply through the tail cable |
| What the arms can show | The whole light one colour or one mode at a time | Several colours on one arm at once; effects travel out from the hub |
| Pairs with a phone | Never | Yes — steps in first-time pairing |
Our app-controlled versions use addressable arms, which is what lets each arm show several colours at once and lets effects travel outward from the hub. That behaviour needs Magic Lantern, our app for addressable lighting. Install a general RGB app instead and the light may connect and respond to brightness and solid colours while none of the radial effects work — which reads like a faulty light and is only the wrong app.
Taking one outdoors
The arms are the durable part. The vulnerable points are the joints, and there are far more of them here than on a plain strip: every arm meets the hub at a connection, and the tail leaves through another. On a copper wire light with fifty branches, that is fifty joints inside one small hub.
Water does not usually attack the LEDs directly. It gets into a joint, wicks along the inside of the sleeve, and corrodes a contact where you cannot see it. The failure shows up later in one of two ways — an arm goes dead, or an arm sticks on one colour — while everything else still works.
Two ratings, not one. On battery and solar models the lights and the control box are usually rated separately — the box is the weaker of the two, and it is the part that has to be positioned with care. Check both figures rather than the headline one, and site the box where it drains and stays out of standing water.
So if the light is going outside:
- Mount the hub so it drains. Any hub sitting where water can pool around it will eventually take water into the joints, whatever it is rated for.
- Point the tail exit downward so water runs away from the opening rather than into it.
- Keep the power connection indoors or in an enclosure. The strip-to-cable joint is the most common entry point.
- Check the rating of the specific model you bought. Not every firework light in the range is built for permanent outdoor exposure, and a version intended for a covered porch is not the same as one for an open wall.
It lights, but something is wrong
| What you see | Usually means | What to do |
|---|---|---|
| One arm dead, the rest fine | That arm's connection at the hub, not the arm itself | Addressable: check whether the arms after it in the chain still work — that tells you power or data. Copper wire: one dead branch in fifty barely shows once fanned |
| An arm stuck on one colour after rain | Water in that arm's joint at the hub | Dry the hub, re-site it so it drains, and get the power joint under cover |
| The middle looks brighter than the tips | Arms sit close together near the hub, so their light overlaps. A spacing effect, not a fault | Widen the fan. Pronounced on wire lights, whose beads spread further apart toward the tips |
| Will not pair with any app | A remote-only light, or a general RGB app on an addressable one | Remote-only never pairs; an addressable light needs Magic Lantern |
| Connects and changes colour, but the radial effects do not run | Wrong app | Install Magic Lantern — which app controls your light |
Identify the build, lay the light flat and measure the spread, fix the hub with a rated fixing, then set the shape and route the tail last. If it is going outside, site the hub to drain before you think about the rating.
Questions about a specific firework light of ours? Contact us.