Water ripple light placement: where it sits decides whether it reads as water
You mount the ripple projector high on the wall, aim it across the ceiling, switch it on under the downlights, and get a faint, racing pattern that nobody mistakes for water. Where the unit sits, what the pattern lands on and how much other light is in the room decide the result. The settings are the small part.
Key takeaways
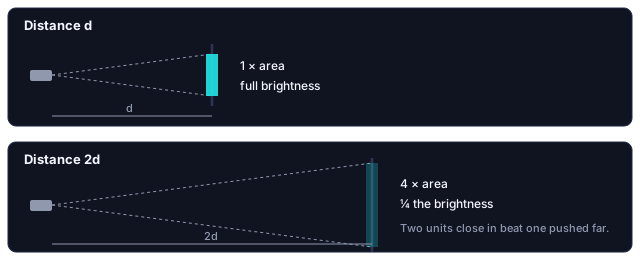
- Double the distance to the surface and the pattern covers four times the area at a quarter of the brightness. Two units at half the throw beat one pushed to cover everything.
- Matt white walls or a smooth painted ceiling only. Gloss, dark paint, heavy texture and patterned wallpaper each kill the pattern.
- Plan for low ambient light, a couple of lamps at most. Under full room lighting the effect is barely visible.
- Slow it until you are not sure it is moving. Faster than about one cycle a second reads as animation, not water.
- 2-channel is one field, enough for an accent. 4-channel runs crossing fields at different rates, which is what reads as water.
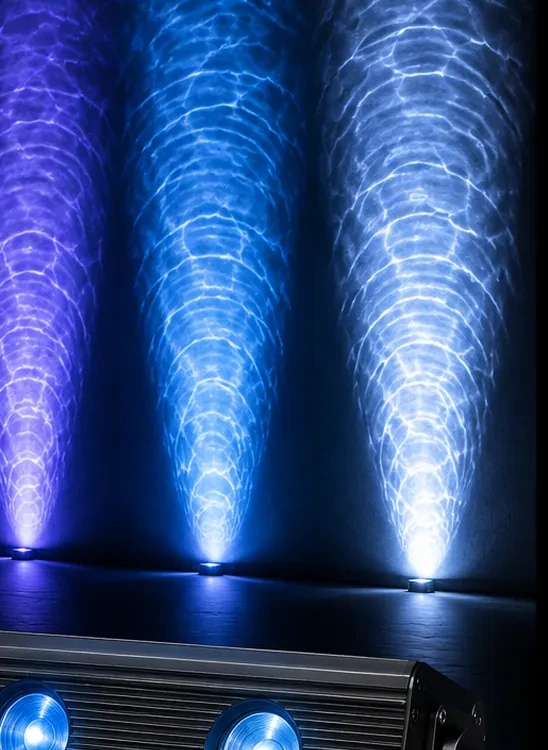
What makes a pattern read as water
Real water caustics are what you get when a wavy surface bends light into overlapping bright lines. Two properties make them read as water rather than as a moving pattern:
- Several wave trains at once. Real water always has more than one set of waves crossing at different angles and rates. A single, regular, repeating ripple reads as mechanical almost immediately.
- Slowness. Water surfaces move slowly. The pattern drifts rather than races.
2-channel or 4-channel: what the extra channels buy
Channel count is how many light elements the controller drives independently. That maps directly onto the first property above.
| 2-channel | 4-channel | |
|---|---|---|
| Pattern | One ripple field, moving as a whole | Multiple fields that can run at different rates and phases and cross each other |
| Reads as | A moving light pattern — pleasant, clearly an effect | Water, if it is set slowly enough |
| Best for | Accent on a small wall, alcove, bar front, feature panel | Ceilings, large feature walls, anywhere the effect is the point rather than an accent |
| In short | Enough if the effect is decoration | The one to buy if you want people to look twice |
If you are lighting a small area and the ripple is background texture, the 2-channel unit does the job and there is no reason to spend more. If you are covering a ceiling and you want the "is that real?" reaction, the extra channels are the thing that produces it. No setting on a 2-channel unit substitutes for having independent fields.
How far from the surface
Move the unit twice as far from the surface and the pattern covers twice the width and twice the height. That is four times the area, lit by the same amount of light. So the pattern is a quarter as bright. This is geometry, not a specification you can shop around.
Double the distance = 4× the coverage, ¼ the brightness.
| Throw distance | Pattern width | Area lit | Brightness |
|---|---|---|---|
| 1 m | 1× | 1× | 1× |
| 1.5 m | 1.5× | 2.25× | about 45% |
| 2 m | 2× | 4× | 25% |
| 3 m | 3× | 9× | about 11% |
A small USB unit draws around 3 W and throws a pattern roughly 2 m across from 2 m away; past that it thins quickly. So the practical question is not "how far can it throw" but "how large a pattern do I want, and will it still be bright enough there". Work it the other way round:
- Decide the pattern size you want on the surface. Measure it — a section of wall, or a ceiling area.
- Set the unit up temporarily and move it until the pattern is that size. Two minutes with the unit on a chair tells you more than any specification.
- Now look at the brightness at that distance, in the room's normal lighting. If it has gone faint, you need either a shorter throw and a smaller pattern, or a second unit covering the other half of the area.
Two units at half the distance each look dramatically better than one unit pushed to cover everything. Their patterns also overlap and interfere, which adds exactly the multiple-wave-train quality that makes the effect convincing.
The surface matters more than the unit
Caustic patterns are made of fine bright lines, and fine detail only survives on a surface that does not scatter it.
| Surface | Result |
|---|---|
| Matt white or pale plaster | Best. Holds the detail, reflects it back evenly |
| Smooth painted ceiling | Excellent — and ceilings are usually the least cluttered surface in the room |
| Heavy textured render, woodchip, rough stone | The texture's own shadows compete with the pattern. The effect becomes mush |
| Gloss paint, tile, glass | Reflects rather than diffuses. You see a bright reflection of the unit itself, not a pattern |
| Dark walls | Very little comes back. Technically working, visibly not |
| Patterned wallpaper | The pattern and the ripple fight. One of them loses |
If your feature wall is dark or textured, put the ripple on the ceiling instead. It is nearly always the better surface and it is the one people do not think of.
How much room light it survives
A projected effect is only visible as the difference between its bright lines and the surface around them. Add general room light and you raise the surrounding brightness without raising the pattern, so the contrast collapses. No setting fixes this and no amount of output wins outright, because your eye adapts to the brightest thing in the room.
| Room light | What you see | Plan for it? |
|---|---|---|
| Full lighting, downlights on | Effect barely visible | No. Wrong product for a room that must stay bright |
| Low ambient, a couple of lamps | Pattern clearly visible, room still usable | Yes. This is the target condition |
| Dark room | Most dramatic; you will want it dimmer and slower than expected | Yes, with brightness backed off |
The same contrast rule governs every projected effect, including a star projector's nebula layer.
Face-on or oblique
Mounting the unit square to the surface gives an even pattern with consistent scale. Mounting it off to one side stretches the pattern away from the unit — the far side of the pattern is larger and dimmer than the near side.
Oblique is not a mistake. On a long wall it produces a natural-looking gradient that suits the effect, because real water light through a window is oblique too. What you should avoid is an angle so shallow that the near edge is a hard bright band. If you can see a distinct bright line where the pattern starts, open the angle up.
For ceilings, mount low and shoot up rather than mounting high and shooting across. Shooting across a ceiling from close to it gives you that hard near band across the whole install.
How slow to run it
Every ripple unit we have ever tested looks better slowed down from its factory setting. Water surfaces in life move at well under a couple of cycles per second, and once the pattern moves faster than that your eye classifies it as an animation rather than as water. Most units offer three speed steps; the lowest is the one to start from.
Set it so slow that you are not sure it is moving when you glance at it, then bring it up a little. If people in the room notice the movement rather than the light, it is still too fast.
On camera, slow wins even more heavily. Phone video samples at a fixed frame rate, and a fast-moving fine pattern turns into visible strobing or moiré. If the install is going to be filmed — a bar, a shop window, anything social — slow the ripple down and test on camera before you sign it off. What looks good to the eye and what records well are not the same setting.
Noise and heat before you mount it
Mechanical units make noise
Any ripple unit that moves an optical element has a motor, and a motor is audible in a quiet room. In a bar or a shop, irrelevant. In a bedroom at 1 a.m., it is the thing that gets the unit unplugged. If the install is somewhere quiet, check for motor noise before you mount it permanently — hold it running next to your ear at the distance it will actually sit.
Heat and enclosure
These units concentrate light through optics, and the housing gets warm. Do not box one into an unventilated recess, and do not sit one face-down on carpet or fabric. A unit that runs warm in free air will run considerably hotter with no airflow.
When the effect looks wrong
| What you see | Likely cause | What to do |
|---|---|---|
| Pattern is there but visibly loops | Single-field unit; it repeats by design | Slow it down. If the repeat still bothers you, that is what the 4-channel version solves |
| Hard bright band where the pattern starts | Angle too shallow | Open the angle; for ceilings, mount low and shoot up |
| A bright reflection of the unit instead of a pattern | Gloss paint, tile or glass | Move to a matt surface or the ceiling |
| Pattern breaks in scale at a corner | One unit asked to cover two walls | Two units, one per wall — usually cheaper than one unit big enough to try |
| App connects but has no ripple settings | A general RGB app instead of the one built for the dedicated controller | Install LotusLamp X and pair again |
Setting it up
Pattern size first, then the throw that gives it, then a look at brightness under the lamps you will actually have on. Matt wall or ceiling, oblique rather than square if the wall is long, speed on the lowest step, and a listen for the motor before anything is screwed down. Our ripple controllers are dedicated units and run on LotusLamp X: which app controls your light has the mapping, and first-time pairing the steps if the unit does not appear.
Questions about a specific ripple light of ours? Contact us.